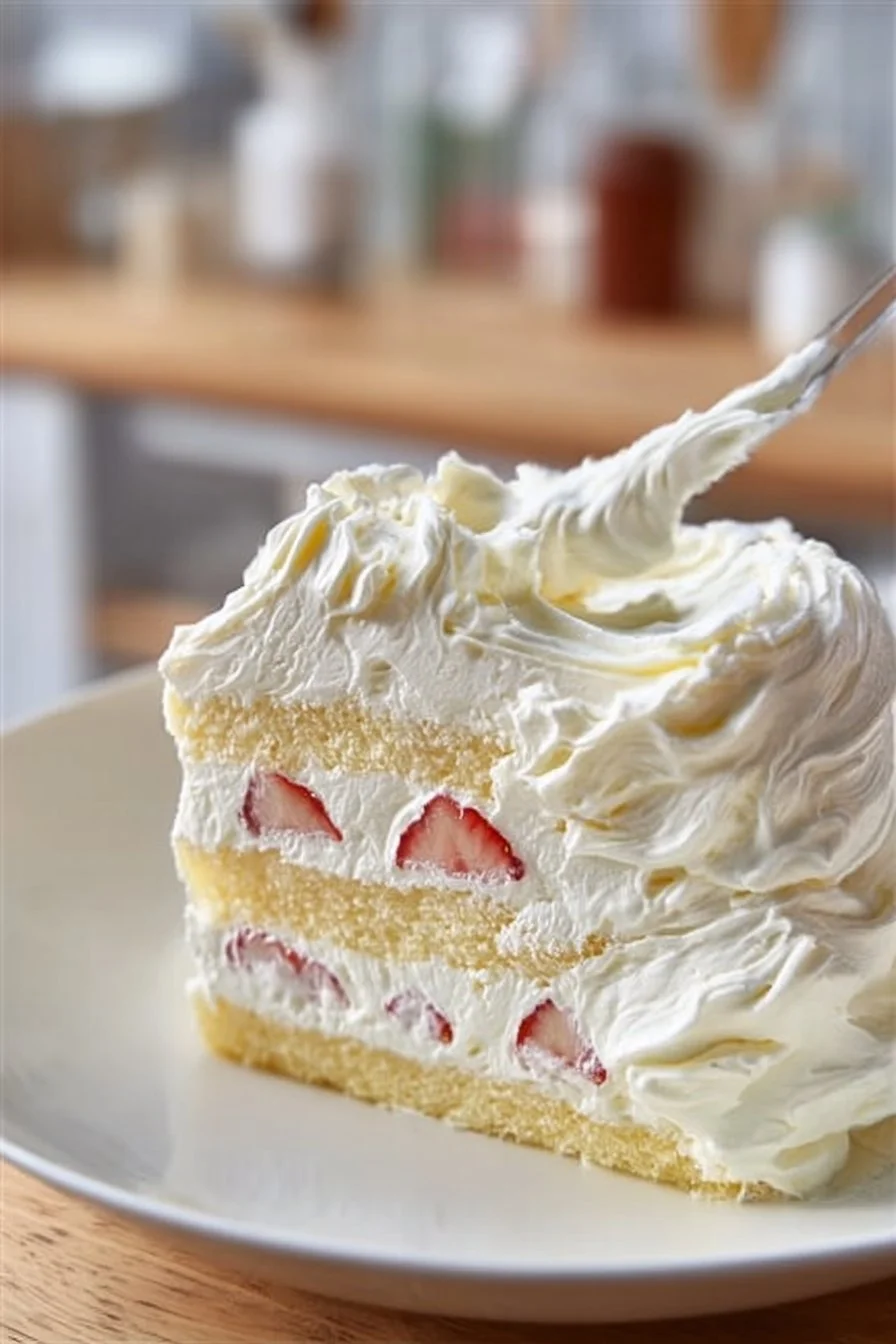
Japanese Strawberry Shortcake
Why this Japanese Strawberry Shortcake works
Japanese Strawberry Shortcake is a delightful dessert that combines light, fluffy sponge cake with sweet strawberries and whipped cream. It’s a perfect treat for birthdays, anniversaries, or just because. The balance of flavors and textures makes it a favorite among many, and once you try it, you’ll see why!
How to make Japanese Strawberry Shortcake
Ingredients:
-
Sponge Cake
- Cake flour: 1 cup (120 grams)
- Baking powder: 1 teaspoon
- Salt: 1/4 teaspoon
- Large eggs: 4, separated
- Granulated sugar: 3/4 cup (150 grams), divided
- Milk: 3 tablespoons (45 grams)
- Neutral oil: 3 tablespoons (40 grams)
- Vanilla extract: 1 teaspoon
-
Whipped Cream Frosting
- Heavy whipping cream: 2 cups (480 grams), cold
- Powdered sugar: 6 to 8 tablespoons, to taste
- Vanilla extract: 1 teaspoon
-
Strawberries
- Fresh strawberries: 12 to 16 ounces, washed and very thoroughly dried
-
Optional Syrup
- Sugar: 3 tablespoons
- Warm water: 1/3 cup
-
Optional Stabilized Whipped Cream Option
- If you want the frosting to hold overnight, add 1 tablespoon instant vanilla pudding mix or 2 teaspoons unflavored gelatin bloomed in 2 tablespoons water and melted, then stream it into cream while whipping to medium peaks.
Directions:
- Preheat the oven to 350 degrees F. Line cake pans with parchment on the bottom.
- Sift together the cake flour, baking powder, and salt in a bowl.
- In another bowl, beat the egg yolks with half the sugar until pale and thick. Mix in the milk, oil, and vanilla extract.
- In a clean bowl, beat the egg whites until foamy, then gradually add the remaining sugar. Beat until firm peaks form.
- Fold one-third of the egg whites into the yolk mixture. Then, gently fold in the remaining whites.
- Sift the dry ingredients over the batter and carefully fold until just combined.
- Divide the batter into the prepared pans. Tap the pans lightly to release any big bubbles.
- Bake until lightly golden and a toothpick comes out clean—about 15 to 18 minutes for two 6-inch pans or 23 to 25 minutes for one 8-inch pan.
- Cool for 10 minutes, then remove from the pans and cool completely on a rack.
- If using syrup, dissolve the sugar in warm water and cool.
- Whip the cold cream on medium speed until it thickens. Add the powdered sugar and vanilla, then whip to medium peaks.
- Slice the cake into layers and brush with syrup if using.
- Layer the cake with whipped cream and sliced strawberries. Frost the top and sides, then decorate with whole strawberries.
- Chill for 30 minutes before slicing for cleaner pieces. Serve and enjoy!
How to serve Japanese Strawberry Shortcake
Serve this delicious strawberry shortcake chilled. It’s ideal for gatherings, so slice it up and share with friends and family. A sprinkle of powdered sugar on top can add a lovely finish.
How to store Japanese Strawberry Shortcake
Store any leftover cake in an airtight container in the refrigerator. It’s best enjoyed within a couple of days. If using whipped cream, be aware that it may soften over time.
Tips to make Japanese Strawberry Shortcake
- Ensure your ingredients, especially the cream, are cold for the best whipping results.
- Use fresh, ripe strawberries for the sweetest flavor.
- For added stability in your whipped cream, consider the optional stabilized option if you’re preparing the cake in advance.
Variations
You can customize this recipe by adding other fruits, like raspberries or blueberries, or try different flavors of whipped cream, such as matcha or chocolate.
FAQs
1. Can I make this cake in advance?
Yes, you can bake the sponge cake a day ahead. Just store it in an airtight container until you’re ready to assemble.
2. How long can I keep leftovers?
Leftovers are best eaten within 2 to 3 days when stored properly in the fridge.
3. Can I freeze the sponge cake?
Yes, you can freeze the sponge cake layers wrapped tightly in plastic wrap. Thaw them completely before adding the frosting and strawberries.
Japanese Strawberry Shortcake
Ingredients
Sponge Cake
- 1 cup Cake flour (120 grams)
- 1 teaspoon Baking powder
- ¼ teaspoon Salt
- 4 large Eggs, separated
- ¾ cup Granulated sugar (150 grams), divided
- 3 tablespoons Milk (45 grams)
- 3 tablespoons Neutral oil (40 grams)
- 1 teaspoon Vanilla extract
Whipped Cream Frosting
- 2 cups Heavy whipping cream (480 grams), cold
- 6 to 8 tablespoons Powdered sugar to taste
- 1 teaspoon Vanilla extract
Strawberries
- 12 to 16 ounces Fresh strawberries, washed and very thoroughly dried
Optional Syrup
- 3 tablespoons Sugar
- ⅓ cup Warm water
Optional Stabilized Whipped Cream Option
- 1 tablespoon Instant vanilla pudding mix or 2 teaspoons unflavored gelatin bloomed in 2 tablespoons water and melted, then streamed into cream while whipping to medium peaks.
Instructions
Preparation
- Preheat the oven to 350 degrees F. Line cake pans with parchment on the bottom.
- Sift together the cake flour, baking powder, and salt in a bowl.
- In another bowl, beat the egg yolks with half the sugar until pale and thick. Mix in the milk, oil, and vanilla extract.
- In a clean bowl, beat the egg whites until foamy, then gradually add the remaining sugar. Beat until firm peaks form.
- Fold one-third of the egg whites into the yolk mixture. Then, gently fold in the remaining whites.
- Sift the dry ingredients over the batter and carefully fold until just combined.
- Divide the batter into the prepared pans. Tap the pans lightly to release any big bubbles.
- Bake until lightly golden and a toothpick comes out clean—about 15 to 18 minutes for two 6-inch pans or 23 to 25 minutes for one 8-inch pan.
- Cool for 10 minutes, then remove from the pans and cool completely on a rack.
Frosting and Assembly
- If using syrup, dissolve the sugar in warm water and cool.
- Whip the cold cream on medium speed until it thickens. Add the powdered sugar and vanilla, then whip to medium peaks.
- Slice the cake into layers and brush with syrup if using.
- Layer the cake with whipped cream and sliced strawberries. Frost the top and sides, then decorate with whole strawberries.
- Chill for 30 minutes before slicing for cleaner pieces. Serve and enjoy!